
To Dye For

I have been dyeing fabric using this cheap, easy method for years to use in my art and I had a bit of a lightbulb moment when I realized I could use it as backdrops for my flowers. If you’ve ever tried to photograph a flower arrangement, you’ll soon realise that the background is often the hardest thing to get right.
You want something that isn’t so busy that it distracts from the flowers, but not a completely plain colour either as this can look a bit harsh.
I have rigged up a rail in an outbuilding that I can peg different fabrics to and choose whichever one I think suits the flowers that I’m working with and in this blog I’ll share the method I use to create them.
I have a YouTube video linked below where I demonstrate this method and show lots of examples so scroll down to the bottom for that,
I’d also like to state that I am not an expert on this subject and have picked up tips from many others over the years. I have put some resources at the bottom for you to look at if you want more detail and technical information.
The technique is called low immersion dyeing and differs from batch dyeing where you want to get even, unbroken colours. For that you need a large vat, hot water and you need to continually move the cloth around.
In this method you use a small amount of liquid, a small container and you can leave it alone. You can see why it’s appealing.
You do need a few things though.
Supplies needed
Cellulose fabric - such as cotton, linen, viscose or bamboo. Tighter woven fabric works best.
Procion MX dyes
Soda Ash
Plastic or metal trays - I use cat litter trays to soak the fabric and old microwave containers for the dyeing
Jugs or jam jars for the dyes
Measuring spoons
Mixing implements
Protective gloves, apron and plastic sheet to protect your work surface
Laundry detergent or dye dispersal product such as Colsperse
Iron
Method
If your fabric does not come PFD (Prepared For Dyeing - some craft suppliers offer this) you will need to wash it first in case there’s any finish on it that might interfere with the dyeing process.
Mix your soda ash using the formula of 9 tablespoons to 3.5 litres of warm water (although check manufacture’s guidance for your specific product) and leave if for at least 20 minutes so it’s fully dissolved.
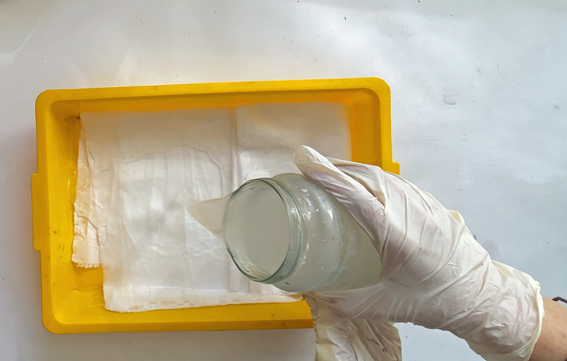
Put your fabric into a tray and pour the soda ash solution on, making sure every part is getting the liquid.
Manipulate your fabric - either pleat it if you want a stripy effect, or scrunch it to get interesting patterns.

Make up your chosen dyes with the formula of 1 heaped teaspoon of dye powder into 250 ml of warm water.
You can scale this up or down accordingly.

At this point it is a good idea to test out the strength of your dye solution on a piece of white paper. You can then adjust the amount of dye to water to get the desired intensity of shade.
Take note that colours always look stronger when they’re wet.

Pour your dye into the container and agitate the fabric slightly if you don’t want to have any white showing in the final result. Repeat if you are using more than one colour.

Once the dye is applied, you need to keep the fabric moist and ideally at a temperature of between 24C and 35C. Covering it with a bit of plastic (I cut up old bags) helps to do this.
Leave for at least 4 hours, or overnight if you can wait that long - I usually can’t!
After this, with gloves on, rinse your fabric in cool water until most of the excess dye has gone. For a small piece then wash with detergent by hand, for a large piece I always put it through the washing machine on a quick wash at a temperature appropriate to your fabric. I’ve never had a problem with getting dye on subsequent washing loads.
Wring dry and then iron from damp to get the smoothest finish and instant gratification!

If you’re disappointed with your first result, you can dye over it by repeating the exact same process remembering you need to add more soda ash as the original will have been washed out. Obviously the colours now on the cloth will effect how the second process looks.
That’s it - I told you it was easy! My main advice would be to experiment and have some fun with it. The materials needed are relatively cheap so you don’t have to worry about wasting them and you can have all sorts of happy accidents.

Resources
Design Matters has many videos on similar methods, some of them free, others very reasonably priced:
Colour Formula Guide: Jacquard Procion MX
Paula Burch has much technical content available here: Paula Burch
Books I’ve found useful are
Colour by Design - Ann Johnston
Tray Dyeing - Committed to Cloth
I get my fabric here: Whaleys Bradford (although delivery is expensive if you’re not buying a large quanitity)
Good places for dyes : Stef Francis George Weil Rainbow Silks